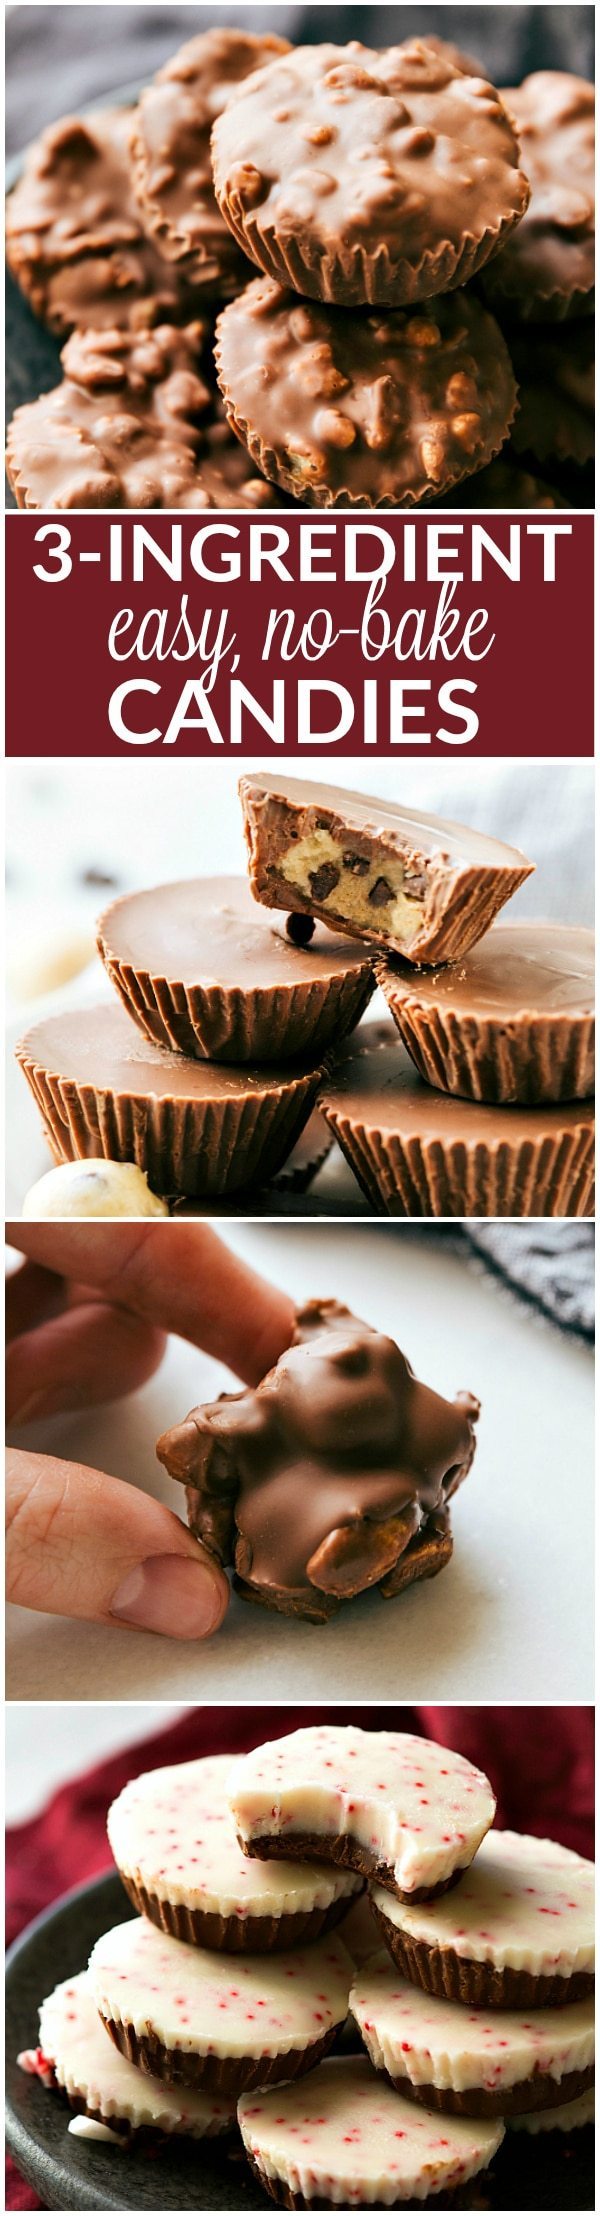
A collection of four different treats all with 3-ingredients that can each be made in a miniature muffin tin. No baking required! Perfect for sharing with friends/family, giving out as gifts, bringing into work, or enjoying yourself!
Hey everyone! How is your week going so far?! Did you notice things are looking a little different around these parts? Over the weekend and into this week, my new site design went live! It’s been several months in the works and I’m so excited it’s finally here. There have been a few hiccups along the way and I sincerely apologize for any inconvenience getting recipes while my site was intermittently down. Hopefully *fingers crossed* we’ve worked out the issues and everything should be working better.
I’ve now got a “recipes” page that allows you to easily search through different categories, there is a “shop” that has all of my favorite kitchen and photography products, AND I’ve got a new eCookbook of my favorite easy weeknight dinners that is free for email subscribers. Additionally, you can now subscribe to get my recipes each time I publish a new post or sign up to get a weekly round-up of everything I’m sharing.
And now, onto some easy THREE ingredient treats that can all be made in a miniature muffin tin! A quick video tutorial is above this text and then more details and the full recipes are below:
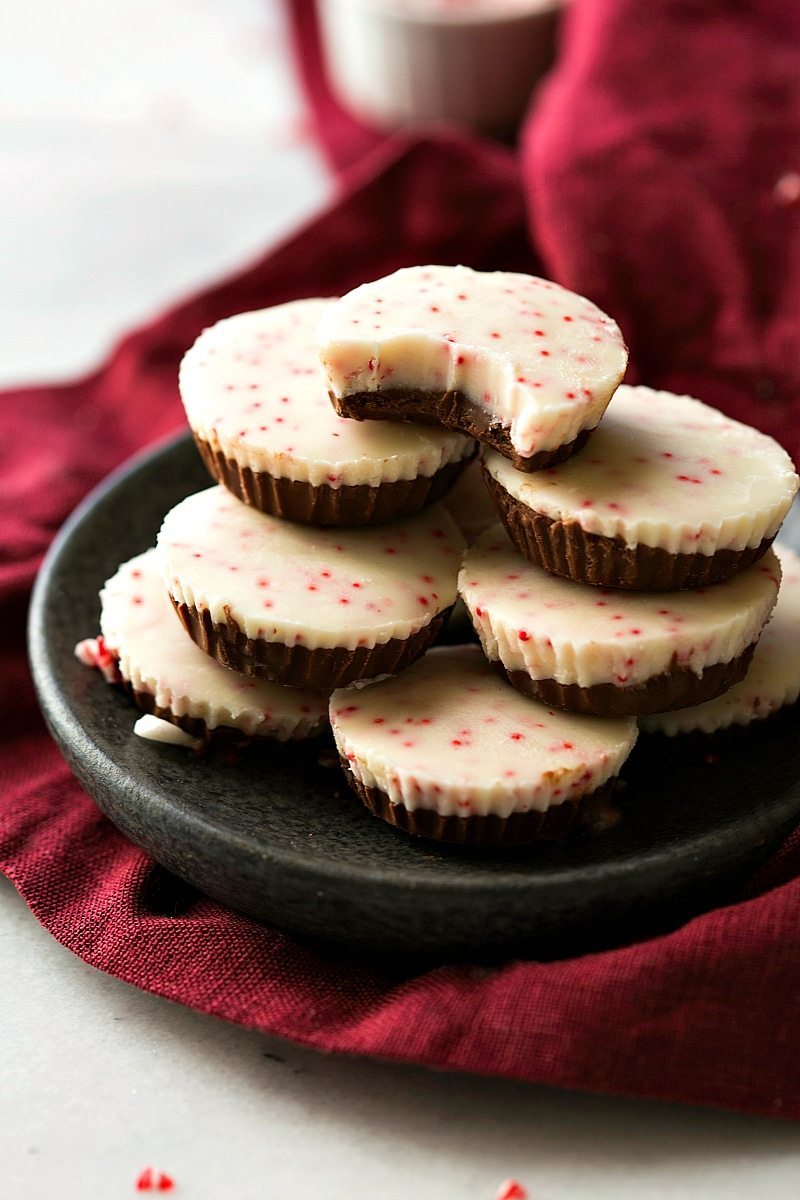
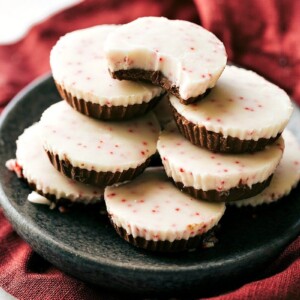
First up: PEPPERMINT BARK BITES. I have a serious obsession with Ghiradelli’s Peppermint Bark Squares, but they are not all that cheap. Especially when you could eat a pack a day during the holiday season! (What, me? Never ?) So those peppermint bark squares are what inspired this entire post. The second I saw them back in the store, I grabbed a bar. The boys and I finished it before we were even home and I knew it was time to make something similar.
So these bites are made to taste *just* like them (although people that tried these said they liked them better!!) with half the cost and very little effort! I use a Hershey’s candy cane bar for the white chocolate top, but if you can’t find that candy bar or want to make these for even cheaper, plain white chocolate and crushed peppermint will work great in its place.
Peppermint Bark Bites
Equipment
- Bowl microwave safe
- Miniature muffin pan with liners
Ingredients
- 1 bar (3-1/2 ounces) Hershey's Holiday Candy Cane Bar see note 1
- 3/4 cup milk chocolate chips
- 1 teaspoon vegetable oil divided
Instructions
- Line a miniature muffin pan with muffin liners and set aside.
- In a microwave safe bowl, combine chocolate chips with 1/2 teaspoon vegetable oil. Melt in the microwave using bursts of 20 seconds, stirring in between each burst for 15 seconds, until smooth and fully melted. Make sure to stir really well in between each bursts as it's easy to burn the chocolate.
- Fill the bottom of the muffin liners with equal amounts melted milk chocolate. Tap the muffin pan a few times to get the chocolate to go in an even layer. Place in the fridge for 5–10 minutes.
- While it's chilling, coarsely chop the candy cane bar and place in another microwave safe bowl. Add in the remaining 1/2 teaspoon vegetable oil and stir.
- Again, melt in the microwave in bursts of 20 seconds, stirring for 15 seconds in between each burst.
- Pour equal parts of the white peppermint chocolate over the milk chocolate. Tap the muffin tin a few times to get the chocolate in an even layer.
- Allow to set.
Video
Recipe Notes
Nutrition
Nutrition information is automatically calculated, so should only be used as an approximation.
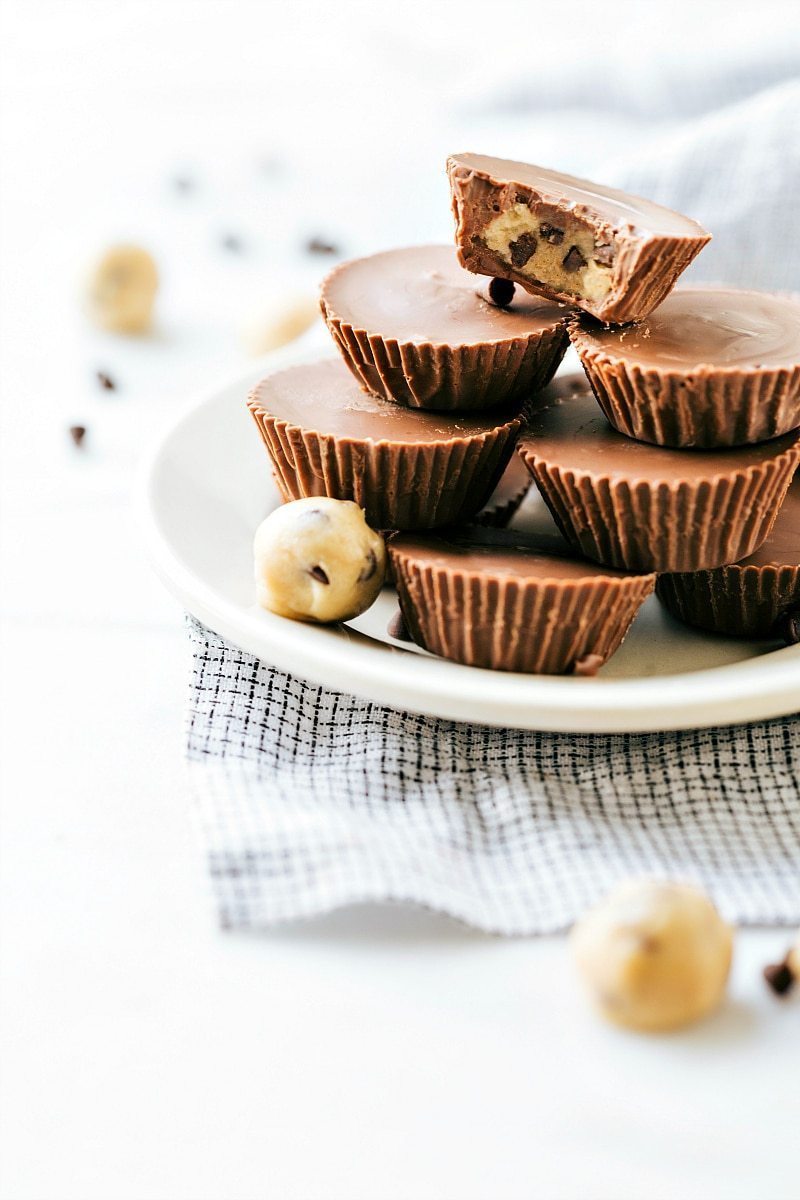
Next up: COOKIE DOUGH CUPS. Last year, I created a healthy version of cookie dough cups (<–link to recipe) which so many of you loved. And then I shared a less healthy cookie dough cup recipe on my friend’s website. It was such a bit hit on her site that Buzzfeed Tasty picked it up and created a video of the recipe. So I think it’s about time I share it here!
HOWEVER, since this is a post on 3-ingredient muffin tin treats, there is a way to make these cookie dough cups with only 3 ingredients — and that is to use refrigerated store-bought cookie dough. At any given time, my mom always has a huge tub of store-bought cookie dough in her fridge and I’m sure many of you have the same. The pre-made cookie dough works wonders if you are pressed for time — it’s fast! And it’s delicious tasting as well. But just in case you’re wanting the full experience of homemade cookie dough cups, I’ve included my recipe here as well.

Cookie Dough Cups
Equipment
- Miniature muffin pan with liners
- small bowl microwave-safe
Ingredients
Edible Cookie Dough
- 3/4 cup flour
- 1/3 cup unsalted butter melted
- 1/3 cup dark brown sugar firmly packed
- 3 tablespoons granulated sugar
- 1/4 teaspoon salt
- 1 teaspoon vanilla extract
- 1 tablespoon whole milk
- 1/3 cup miniature chocolate chips
Chocolate Coating
- 2 cups chocolate chips divided, see note 1
- 1-1/2 teaspoons coconut oil divided
Instructions
- Heat treat flour in the microwave or oven (see note 2). Let flour cool to room temperature before using. The flour should be light, white, and fluffy. If it's off colored or clumpy, it's burnt and shouldn't be used. Spoon the flour into a 3/4 measuring cup and level the top with a table knife. Set aside.
- Melt butter and set it aside to cool back to room temperature—hot butter will melt the sugar and cause greasy or grainy cookie dough. In a medium-sized bowl, whisk together butter and both sugars until the mixture is fully integrated and smooth.
- Add in the salt, vanilla, and milk or cream and stir until integrated. Stir in the flour and miniature chocolate chips. Mix until combined and smooth. Place the cookie dough in the fridge for 10 minutes.
- Roll the cookie dough into small balls (1/2 tablespoon). Slightly flatten the balls into thick discs. You should get about 36 cookie dough discs, but we only need 24 for this recipe so either eat the rest or enjoy them as a topping for another treat.
- Line a miniature muffin pan; we need a total of 24 cups lined.
- In a small microwave-safe bowl melt 3/4 cup chocolate chips with 1/2 teaspoon coconut oil (see note 3). Spoon an even amount of the melted chocolate mixture into the bottom of each muffin cup, using it all among the 24 cups. Gently tap the miniature muffin pan a few times to get the chocolate in an even layer on the bottom.
- Place the disks of cookie dough on top of the melted chocolate mixture in each cup. In the same bowl melt another 1-1/4 cup of chocolate and 1 teaspoon coconut oil.
- Pour an even amount of chocolate over each of the cookie dough cups. Be sure that all the chocolate is used, and fill the cookie dough cups most of the way to the top. Gently tap the muffin pan on the counter a few times to get an even chocolate coating.
- Chill in the fridge for at least 30 minutes or until set, then enjoy!
Recipe Notes
Nutrition
Nutrition information is automatically calculated, so should only be used as an approximation.
P.S. I know a lot of people don’t eat raw cookie dough because of either the eggs or flour; neither concerns me, but consume at your own risk.
Third in the line-up: CRUNCH CUPS. These were purely inspired by leftover Halloween candy. Mini crunch candy bars were one of my first picks in the leftover bowl of Halloween candy. And since they are now long gone and all we’re left with are the dum-dums and laffy taffy’s (?), it was time to replenish!

Crunch Cups
Equipment
- Miniature muffin tin with liners
Ingredients
- 1 cup milk chocolate chips or bar
- 1 teaspoon vegetable oil
- 1/2 cup Rice Krispies cereal
Instructions
- Line a miniature muffin tin with muffin liners and set aside.
- In a microwave safe bowl, combine chocolate chips with vegetable oil and melt in bursts of 20 seconds, stirring in between each burst for 15 seconds. Be patient in melting and make sure to stir really well in between each bursts as it's easy to burn the chocolate.
- Stir in the rice crispies until well coated.
- Using a cookie scoop, scoop the mixture into the prepared muffin tin. Tap the muffin pan a few times on the table to level the chocolate. and then let harden either at room temperature or in the fridge.
- Chill in the fridge for at least 30 minutes or until completely set and enjoy!
Recipe Notes
Nutrition
Nutrition information is automatically calculated, so should only be used as an approximation.
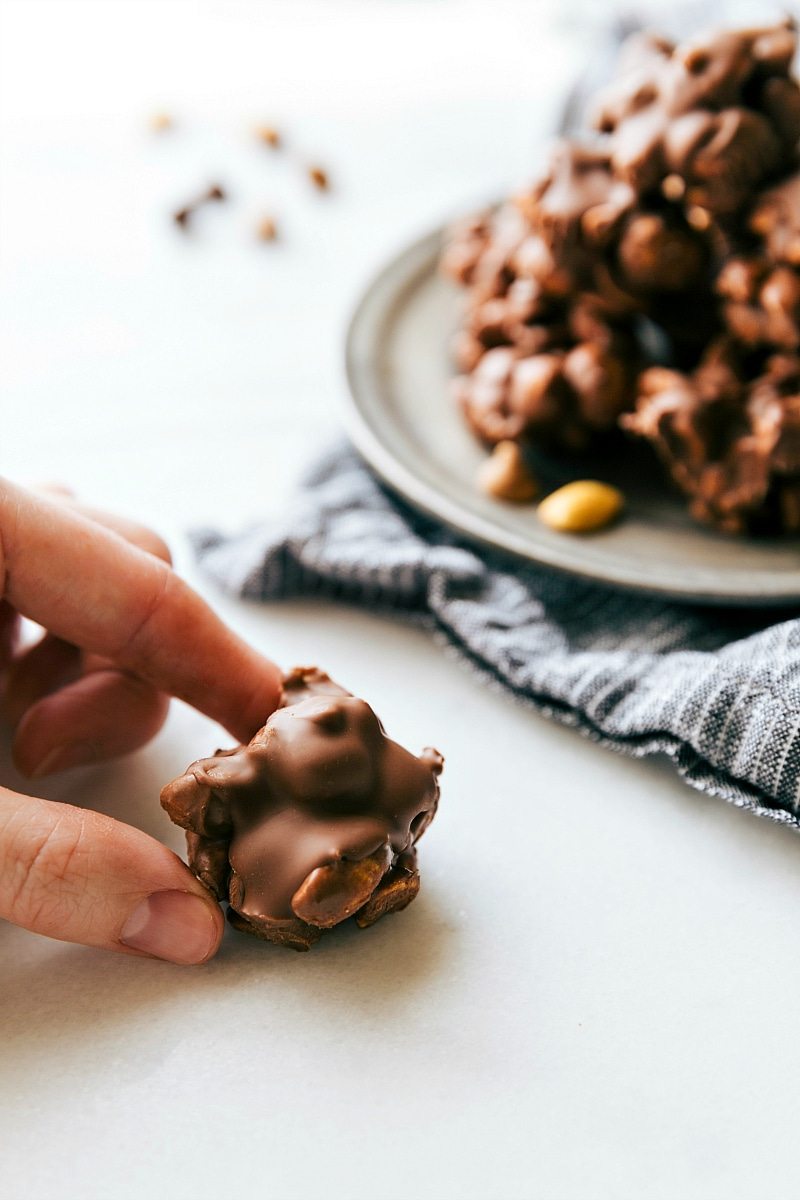
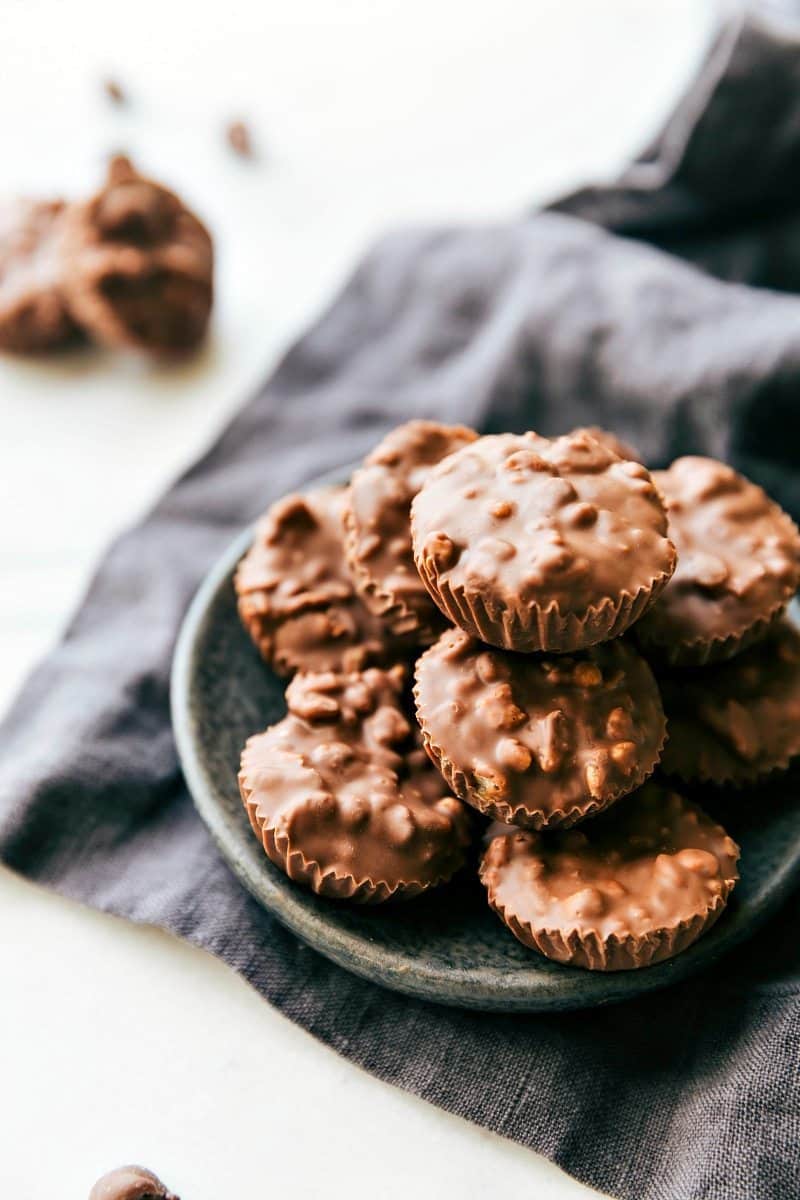
And last: EASY PEANUT CLUSTERS. These are the ultimate peanut butter + chocolate treat! Peanuts + peanut chips + milk chocolate chips = pure bliss. Since they are only 3 ingredients (and really just 2 major ingredients) it’s really important to get the right kind of nuts. Roasted + Salted peanuts are the way to go in these treats. Roasted peanuts have far more flavor and give these treats a more complex flavor. The salt is a nice touch that, again, just heightens that flavor.

Peanut Clusters
Equipment
- Miniature muffin pan with liners
- small bowl microwave-safe
Ingredients
- 1/4 cup milk chocolate chips
- 1/4 cup peanut butter chips
- 1/2 teaspoon vegetable oil
- 1 cup salted and roasted peanuts
Instructions
- Line a miniature muffin pan with muffin liners and set aside.
- In a microwave-safe bowl, combine the chocolate and peanut butter chips with vegetable oil and melt in the microwave in bursts of 20 seconds, stirring for 15 seconds in between each burst. Be patient and make sure to stir really well in between each bursts as it's easy to burn the chocolate.
- Stir in the peanuts until well coated.
- Using a cookie scoop, scoop the mixture into the prepared muffin tin. Tap the muffin pan a few times on the table.
- Spoon any extra leftover chocolate over the top and chill in the fridge at least thirty minutes or until completely set and enjoy!
Recipe Notes
Nutrition
Nutrition information is automatically calculated, so should only be used as an approximation.
g


Very tasty, but a little sticky. Do you know why that would be?
Which was sticky? Did you change any of the recipes?
hi I made these for Christmas tomorrow and they taste great though I made the mistake of using a regular sized muffin tin so they’re a bit thin but hopefully my family wont mind because they taste amazing
I just made the peppermint bark bites. I used crushed candy canes in white chocolate so mine was a little more lumpy.
I had to test one maybe half an hour after the white chocolate had set; by that time the milk chocolate had been in the fridge for over an hour. It was hard to get the paper muffin liner off and the milk chocolate was melting on my fingers after just a couple of bites. Will that stop after a longer time in the fridge, or is there something I can do to help the chocolate harden better? I love the recipe, but I’m giving it as gifts at work so I’d like to make it perfect. ?
Hi Crystina! Did you find they set up after more time in the fridge? It sounds like there may have been just a little too much oil or your kitchen was warm if they were melting! If you make them again I’d reduce the oil a bit and then let them sit in the fridge longer. Enjoy! 🙂
Are these designed for a mini-muffin size pan? The photos seem to look like a regular sized muffin pan. I can’t wait to make them!
Yes they are all done in a miniature muffin pan! 🙂
These recipes are fantastic. I want to do peanut clusters. Is it 1/2 cup of peanut butter chips and 1/2 cup chocolate chips or 1/2 cup combined. Can you use nestles peanut butter chips and chocolate chips?
Thanks so much Marge! 1/2 cup combined, and Nestle’s is exactly what I used 🙂 Enjoy!
Thanks so much. These are yummy!!
You’re so welcome 🙂
The crunch cups were AHHMAZING – made them twice in 1 day cause the family inhaled them. Thank you again for such wonderful and easy recipes!
That is so great to hear!! Twice in one day — wow! 🙂 Thanks so much for taking the time to comment Xena! 🙂
These look great. Do you use the vegetable oil for a specific reason? Is it to help the chocolate set and remain smooth? Thanks.
Yep — remains smooth and easier to work with 🙂 Enjoy!
for the peanut clusters could I use peanut butter instead of peanut butter chips?
I’m sure you could; you’d need more chocolate chips to compensate. I’m not sure the amounts of each but probably only a couple tablespoons of peanut butter (and leave out the oil!). Wish I could give you exact amounts but without testing that I’m uncertain. Enjoy!